Thursday, October 31, 2019

TVR - Cleaning Up 2

Cleaning Up 2
Written by Darren Jones   
Mar 16, 2014 at 03:52 PM

Still waiting for the new exhaust system, so just another weekend with cleaning chores on the car.  The more I'm cleaning it up the more I suspect all the layers of dirt and grime have actually protected the chassis from rust.  Considering the cars reputation, I've yet to find any real rust spots, let alone any type of serious rot.  Fingers crossed and hope this continues.
Rear left side before.


And after.


While under the car there was an unwelcome oil pool.


The source looks to be working its way from the seal around the oil sump.  Another job on the to do list.


Other than that, did a little photoshop to see what the car would be like with darker wheels and a little lowered.  Something for next year....


Wednesday, October 30, 2019

TVR - Cleaning Up

Cleaning Up
Written by Darren Jones   
Mar 03, 2014 at 03:22 PM

So currently am waiting on some new parts to get delivered before continuing with putting the car back together.  So one thing I am waiting on to come from the UK is an ACT Cherry Bomb exhaust system.  Going to take a while for it to get here as the nice chaps at ACT are modifying it for better transport to Japan and easier assembly.  Still no need to put the old exhaust back on at this point, so released the last couple of bolts and removed.  Still all in very good shape, just a couple of scratches, but a keeper for Shaken tests every 2 years.

Cleaned up, protected and ready to store up in the garage roof.


Next part of an ongoing job to clean up the chassis as best I can now.  Later am considering a body off restore and do the job properly, for now just cleaning where I can and see if the cleaning shows up any immediate faults.
14+ years of dust and grim to clear off.


Improving bit by bit.


One thing that did arrive this week was the diagnostic cable and a copy of Roverguage software.  I can't use fully until the engine is running, but did give the chance to connect it up and make sure it works.


All looking good, and can check for any existing error codes.


OK there was one, I cleared it for now but may need to check that resistor if it comes back - a simple resistor that switches the car to different fuel maps.

Tuesday, October 29, 2019

TVR - ACT Induction Kit

ACT Induction Kit
Written by Darren Jones   
Feb 17, 2014 at 07:06 AM

I've heard the explanation a couple of times that all an engine is, is a big air pump.  The better you can get air in and then expel it, the more power you gain.  To this end I ordered the ACT Induction kit to replace the normal air filter and air ducts to route the air to the inlet manifold. 

Standard duct (top) is a thin flexible pipe that has ridges down it's entire length and a little restrictive.  The ACT ducts are thicker rubber and come in a couple of pieces to enable it to fit through the front wing to draw the cool air in.


The K&N filter also included assists in getting that better air flow to the engine.


The standard manifold elbow joint also has a case of the wrinkles and is replaced in the kit.


The new elbow joint does have a right and wrong way to fit.  Narrow aperture goes to the inlet manifold and wider aperture goes to the air flow meter.  And here you see for the first time these pieces are not a perfect fit, they are made with a lot of excess that you need to trim down.


A little trimming with a sharp knife done cautiously and you get a nice fit.


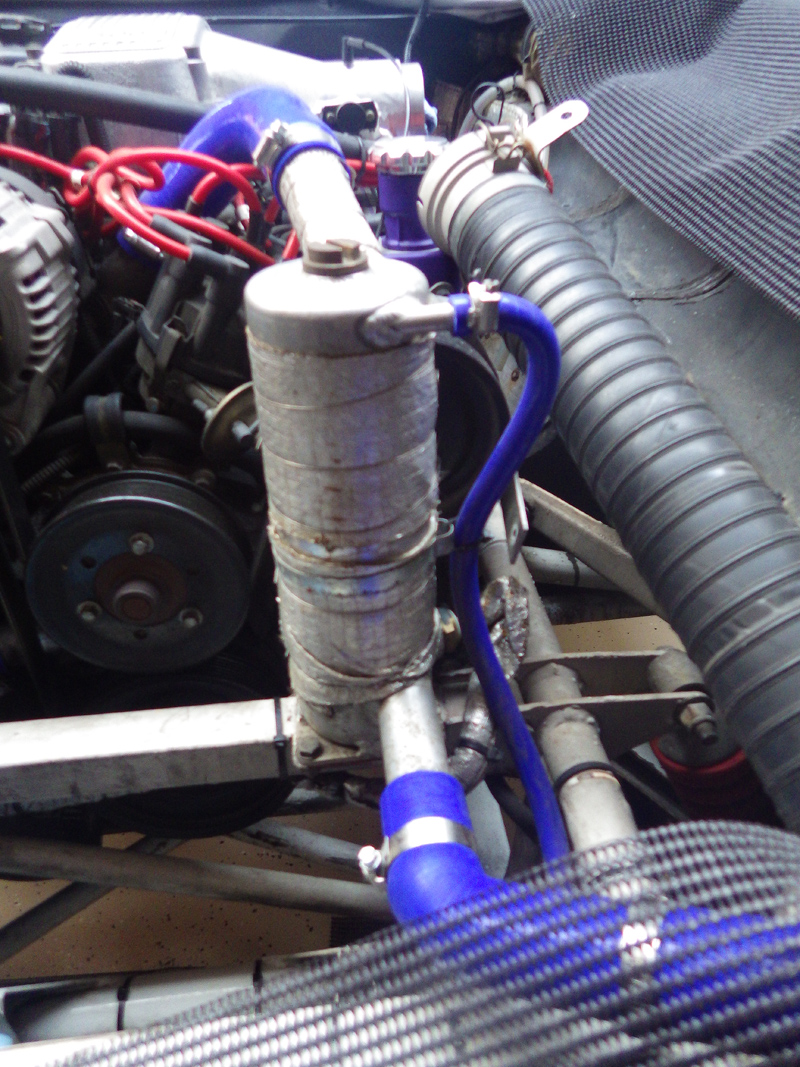
Keeping that as a start point, then work with the other elbow joint from the air filter to where it comes in to the engine bay.  There is a short metal tube that goes through the front to connect this elbow with the longer tube.  Get this in position first and you can then see how much excess needs to be removed for where the filter is mounted.  You can then finally trim the last piece to size and fit the heat wrap on it.
Trim carefully, but don't be afraid to do it.  There is a lot of excess that needs to be cut away.


All in just a couple of hours to complete working carefully and another step closer to restarting the car.  I'm not 100% happy with the supplied heat shielding - especially as this runs close to the exhaust manifold.  So will be looking to get a new one that runs the full length of the duct.


Monday, October 28, 2019

TVR - Refitting Manifolds

Refitting Manifolds
Written by Darren Jones   
Feb 17, 2014 at 03:08 PM

Having gone through the pains of removing the manifolds to remove the precats, I was not looking forwards to the task of fitting them back on.  It was an absolute nightmare of a task to get them off the engine, putting them back on would surely be harder?

Nope, all done in a single afternoon, compared with the 2 weekends I spent taking them off, this was amazing.  And all due to 2 little pieces of advice I received.
1.  Use ARP fasteners.  These are a direct replacement for the original bolts, but have a smaller head size making it much easier to get a wrench on them in the tight confines of the engine bay.


2.  Slot the bottom bolt holes in the manifolds.  Absolute genius!  This allows to have the gaskets held in place and manifold will locate straight onto them for easy fixing of the remainder of the bolts.  Only item to remember here was on the drivers side manifold the confines are really tight.  So you need to tighten the bolts well into the engine before putting the manifold in place or it will get stuck on the bolts.  One it is in place you can back the bolts out and place the manifold right onto the easily.


A few hours in all, but no longer am I afraid of doing this job again should the need every arise.  Coming back together nicely now.


Saturday, October 26, 2019

TVR - A Little Polishing

A Little Polishing
Written by Darren Jones   
Feb 03, 2014 at 07:01 AM

Taking an easy weekend in the garage before I get into slotting the exhaust manifolds before refitting.  Having got stuck on radiator removal I decided to clean up the garage and some parts in the engine bay.

Specifically the expansion tank.


And the swirl tank.


Started out with some fine sanding disks, then some finer paper, but was not making too good progress and kept draining the battery on my drill.  Then I remember, I watch car programs on TV, I know how they do this.....what I need is a polishing wheel Smile

A little shopping trip later I've got myself a new polishing wheel and some supplies.  Am still learning, and the biggest challenge so far seems to be in knowing which compounds to use and I think I'll get some sent over that I know what they are for.  Am not finished on these yet, but I think not too bad for a first pass.

Expansion tank


Swirl Tank


TVR - Manifold removal 3

Manifold removal 3
Written by Darren Jones   
Jan 26, 2014 at 12:28 PM

So I took a rest and came back at the car the following weekend, encouraged by comments on PistonHeads that this can be done, especially if you adopt a James Heriot approach to removing a couple of the bolts.  Well try as I might, I just could not get the spanner on the rear bolts even once, let alone the number of times it would take to fully undo them.  So option 2, remove the starter.


Removing is easy enough, undo the electrical connectors (2 on the positive, one on negative).  Then undo the 2 bolts holding it on - these require a 8mm allen key drive to undo and are fairly tight.  The top bolt is located blind but not too bad to get to.  5 minutes later starter motor is removed and easy access to the remaining bolts.  In short order all the manifold bolts are removed and ready to remove the manifold.

And that's where it stops.  On the drivers side there is not much room and the manifold can not be removed, it gets stuck on water pipes going forwards and hits the air conditioner unit above.  Not going to mess with the gasses in the air conditioner, so need to move the cooling pipes that were bolted to the rocker cover by 2 different bolt types.

Front


Rear


Why 2 different types I do not know, but had to go shopping to get drives for both.

Completely undone the manifold still can not quite fit past the pipes and in order to move them further, need to undo from the bottom where it goes to the radiator which means draining the cooling system.  Once done there is just enough movement in the cooling pipe to squeeze the manifold past  it.  Remove the expansion tank and the manifold can then come forward enough to lift out.


All pieces now out, sensors removed and one already with precat removed.  Now to clean up while waiting for new parts from the UK and then refitting.


Friday, October 25, 2019

TVR - Manifold Removal 2

Manifold Removal 2
Written by Darren Jones   
Jan 19, 2014 at 03:21 PM

Day two in removing the exhaust manifolds did not go so well.

Having got a couple of new spanners to assist in getting better access to the manifold bolts, I was thwarted by a stubborn bolt and gave up for the day.  Bolts on the underside of drivers side manifold are harder to get at, and one has no room for a ring spanner as will hit the manifold.


Plan now is to get a couple of additional spanners that are recommended to help get them off.

Snap-on flankdrive plus 14mm SOEXM14 combination wrench
Snap-on 4 Way Angle Head VSM5214B
Facom straight ring spanner 59.14x15

Information from 
Pistonheads.com along with some very useful tips on removing the manifolds and tools needed.

Having given up on that as I was under the car anyway I did a little clean up.  Having spotted a couple of drips of oil on the garage floor I need to track down where it is coming from and then a plan to fix.  Not so easy as the bottom of the car is caked in grim and some oil.

So clean up the clutch cylinder.


Gear box.


And next just going to clean up the driveshaft tunnel and look for any trouble spots.  Although chassis here looks pretty good.


 I also found another item to repair - list keeps getting longer.  A heat shield over the exhaust was found in 2 pieces but should be one.  Looks to be a type of fibre glass with TVR logo on it.  I'm betting this will be hard to find a replacement.


TVR - Manifold Removal 1

Manifold Removal 1
Written by Darren Jones  
Jan 20, 2014 at 07:53 AM

The TVR bible only suggests it is possible to remove the exhaust manifolds with the engine in the car.  Forum members are a little more positive it can be done and have one it.  Me?  Am not completely convinced yet.

Access is the issue, from both above and below.  On the top side the air intake needs to be removed, and on the bottom side you need to completely drop the exhaust off in order to get access to the bottom side of the first manifold.

Removing the HT cables to get better access on the bolts, I first find one cylinder probably not been firing at all.


And then my joy increases as another HT lead just snaps.


But a couple of hours later after lying on a cold concrete floor in contorted positions, it is finally off.


Enough for one day, get warm and refreshed before tackling the second side. 

Thursday, October 24, 2019

TVR - Addressing the Heat Issue

Addressing the Heat Issue
Written by Darren Jones   
Jan 17, 2014 at 04:59 PM

A little shopping for some axle stands to supplement the 4 ramps, a good car jack, some rubber protective carpets and am ready to begin.  Car is at a good height to work on and first job is to get better access to the engine bay, so off should come the bonnet.  A quick search on PistonHeads.com for any gotchas reveals that if the bonnet hinges fail, it can be a real pain to fix.  So some ease it oil soak on the bolts first, some tape to mark the position and off it comes easily.


The first job is going to be to inspect the exhaust catalytic converter and the precats in the manifold, so going to have to start removing that.  The Y piece is connected to the manifold by two V clamps, one for each side.  Removal of these is easy enough.  Again just a little ease it oil to free it up, undo one nut on each clamp, then a small tap with a persuader frees it up from the manifolds.

Next step is to free the Y piece up from the other end of the exhaust.  Due to the limited space to move the Y piece you need to back the remaining part of the exhaust off.  This involves undoing a U clamp at the bottom of the Y piece, and a bolt holding the exhaust to the engine block.  The best access I found for doing this is by removing the front passenger side wheel.  Easy access.


Then to allow the exhaust to move backwards you need to undo the bolts on the plate holding the exhaust in the middle of the car, and the anti-roll bar positioned just behind it.


Y piece then comes off easy.  Pipe looks to be in good condition but  it is the catalytic converter inside that counts.  Using an inspection mirror mirror and a torch to check it looks ok but will need further checks.


The precats however, easy to see these have failed.
Left side.


Right side.


Manifolds will now need to come off completely and remove the rest of the precats.

TVR - Overheating Woes

Overheating Woes
Written by Darren Jones   
Jan 18, 2014 at 01:16 AM

Over my new year holiday I got another couple of new issues on the car and have now decided to put it up on the ramps for a while and get it sorted out.  First on a drive back from the beach I was stuck in a little slow moving traffic for a while and the engine temperature kept climbing.  After about 20 minutes it went off the scale and had to park it for a while to cool down and wait for traffic to improve.  Lost some cooling fluid but seems to be the only damage from the heat.

Have since then found a great source of information from other TVR owners at 
PistonHeads.com.  They have a great forum for TVR owners and even one specifically for the Chimaera.  What's more there is a great bunch of people there, very knowledgeable and quick with the answers and wit.  After a little discussion there it was diagnosed I had an air lock in the cooling system, and given the steps for how to fix it.  What we've not been able to answer is the oddity of the number of fans I have.  The "bible" mentions 1 fan on early models, and two fans on later models.

Now I have 2 fans on the back of the radiator.

And one fan on the front.  A previously unknown configuration.  Perhaps specifically for cars in hotter climates?

Cooling sorted out it was time for a test drive.  Initially this looked very good.  Driving along open roads the temp was barely getting to 70 degrees.  Into traffic it would rise to low 80's but holding there.  Completely normal.  But paranoid as I am I looked under the hood and found an issue.  Some black streaky lines on the heat shield that turned out to be the remains of an electrical shroud for some wires.  Completed melted by the heat from the exhaust.  Exhaust is getting hotter than it should, possibly from a catalytic converter failure and needs to be fixed.


Time to put the car up for a while.